

Building a dream home is a monumental undertaking, and it is easy to get caught up in the exciting visual details like selecting quartz countertops, choosing the perfect hardwood floor finish, or designing a sprawling master bathroom. However, the true success of any custom home is determined long before the first wooden wall stud is framed. The raw land itself—its topography, its hidden subterranean characteristics, and its legal boundaries—dictates the structural integrity and long-term viability of everything built upon it.
Skipping or rushing through proper land preparation is the most common and financially devastating mistake a new builder can make. When the earth is not respected and correctly engineered, the consequences manifest as cracked concrete foundations, perpetually flooded basements, and blown construction budgets that can derail the entire project. The ground must be shaped, stabilized, and meticulously mapped to transition from a piece of raw nature to a secure, functioning residential footprint.
This comprehensive guide serves as your step-by-step roadmap for preparing your land for a new build. We will explore how to accurately assess soil health, strategically grade the earth for optimal water runoff, lay the essential groundwork for underground utilities, and plan the critical off-grid waste management systems necessary for rural or suburban properties. By understanding and executing these foundational steps, you safeguard your investment and ensure your home stands solid for generations.
1. Mapping the Property and Removing Initial Obstacles
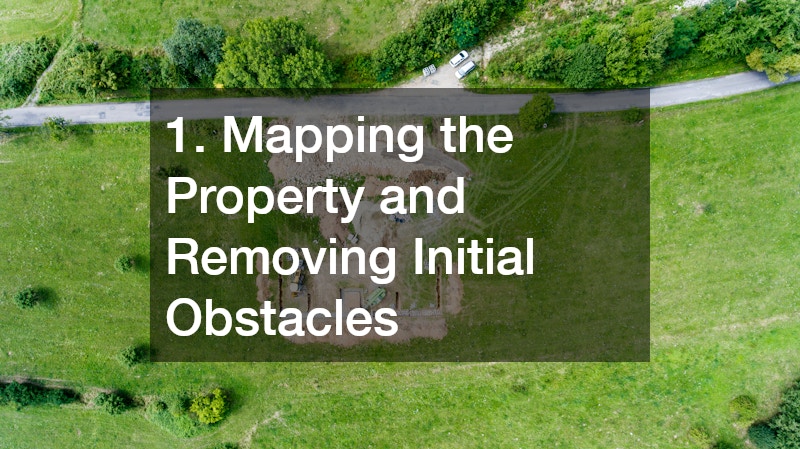
Conduct a Thorough Boundary and Environmental Survey
Before you touch a single blade of grass or move a single stone on your new property, you must have an absolute, legally binding understanding of your property lines. Relying on old fence lines or the verbal assurances of a previous owner is a dangerous gamble. If you accidentally build a driveway, a retaining wall, or a portion of your garage on a neighbor’s land or a city easement, you can be legally forced to tear it down at your own expense.
-
Hire a licensed land surveyor: Bring in a professional to physically mark your exact property lines, zoning setbacks, and utility easements with high-visibility stakes. This provides a safe, defined perimeter for your architectural plans.
-
Identify environmental restrictions: Many plots of land feature hidden environmental protections. You need comprehensive site development services to map out protected wetlands, endangered vegetation zones, and protected wildlife habitats. Violating these zones can result in massive government fines and immediate halt-of-work orders.
-
Establish optimal access points: A survey will also help you determine the safest and most logical place to establish your construction entrance. This entrance must eventually transition into your permanent driveway, meaning it needs to be mapped in a location that offers safe lines of sight for pulling out onto public roads.
Clear Vegetation Systematically to Save Usable Timber
Once your boundaries are strictly defined, the physical transformation of the land begins with clearing away obstacles. However, land clearing should never be a blind, scorched-earth process. Mature trees add massive aesthetic and financial value to a property, provide natural summer shade that lowers cooling costs, and help prevent soil erosion.
-
Tag the trees you want to keep: Walk the property with bright surveyor’s tape and mark every healthy, mature tree you wish to preserve. Ensure that all heavy machinery stays well outside their critical root zones (usually extending as far out as the tree’s canopy). Driving heavy equipment over these root systems compacts the soil and can slowly kill a tree over several years.
-
Evaluate your clearing methodology: The way you handle debris depends heavily on the scale of the parcel. For lightly wooded or brush-heavy lots, it might make financial sense to look into excavator rentals for a DIY approach to pulling up small stumps and moving fallen logs.
-
Process the debris wisely: Decide early on how to handle the organic waste. Renting a commercial wood chipper can turn brush into valuable mulch for your future landscaping. Larger timber can be bucked and split for firewood, or even milled into custom lumber for decorative beams inside your new home.
2. Assessing Soil Health and Groundwater Levels
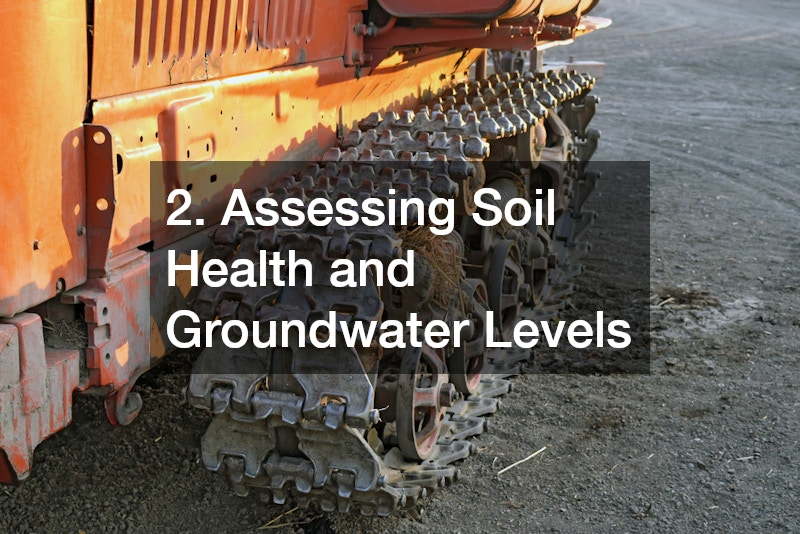
Order Geotechnical Reports to Determine Bearing Capacity
You cannot judge the structural integrity of your land by looking at the topsoil. The earth beneath your feet is composed of various layers of organic matter, clays, sands, and rock, all of which react differently to the massive, concentrated weight of a house. To prevent your foundation from sinking, shifting, or cracking in the future, you must scientifically determine the bearing capacity of the soil.
-
Commission a core drilling test: A geotechnical engineer will drill deep into the earth at the exact site of your future foundation to extract soil core samples. This reveals the precise composition of the earth layer by layer.
-
Analyze the engineering data: Once the report is generated, it dictates the structural requirements of your concrete footings. Experienced excavating contractors rely heavily on these reports. If the soil is weak or expansive, they will know exactly how much unsuitable material needs to be removed and replaced with engineered, structural fill dirt.
-
Prepare for hidden costs: Geotechnical testing can reveal the presence of subterranean bedrock just below the surface. If bedrock is found where your basement is supposed to go, excavation companies will have to bring in specialized hydraulic hammers or even use controlled blasting techniques to carve out the foundation, which requires a significant adjustment to your construction budget.
Identify Natural Drainage Patterns to Prevent Future Flooding
Water is the single most destructive force to a residential structure. If the land naturally slopes toward your future home, every major rainstorm will direct thousands of gallons of water straight into your foundation walls, leading to hydrostatic pressure, basement leaks, and mold.
-
Observe the land during a storm: Visit your lot during a heavy downpour to map out the natural water flow. Note where water pools, where temporary streams form, and how quickly the ground absorbs the moisture.
-
Design strategic water management: Use this observational data to plan your grading strategy. You will need to design swales (shallow drainage ditches), retaining walls, or underground French drains to catch surface water and redirect it safely away from the building envelope.
-
Understand soil drainage capabilities: Different soils handle water very differently, which directly impacts your foundation risk.
3. Shaping the Earth for Your Foundation and Utilities

Establish a Level Pad with Proper Compaction Techniques
With the land cleared and the soil tested, the heavy earthmoving begins. Creating the building pad is a highly precise operation. The ground must be cut away from the high points and filled into the low points until a perfectly level, incredibly dense surface is achieved. If this step is rushed, the soil will settle unevenly under the weight of the house, snapping the foundation in half.
-
Utilize precise laser guidance: Modern site prep excavations rely on heavy machinery equipped with laser-guided grading systems. This technology ensures that the building pad is cut to the exact millimeter specified by the structural engineer.
-
Compact the soil in measured lifts: When adding fill dirt to level a slope, you cannot simply dump a massive pile of earth and drive over it. The soil must be spread in thin layers, usually six to twelve inches thick, known as “lifts.”
-
Insist on the right equipment: Each lift must be aggressively compacted using a heavy vibratory sheep’s foot roller. This machine pushes the air out of the soil and locks the particles together, achieving the necessary density to support concrete footings without future settling.
Dig Utility Trenches Before Pouring Concrete
Before the concrete trucks arrive to pour your foundation, the invisible lifeline of your home must be laid underground. Your property needs to be connected to the electrical grid, municipal water supplies (or a private well), and modern telecommunications. Trenching is a delicate, highly regulated process that requires strict adherence to local building codes.
-
Organize the utility layout: Color-code your trench lines on the ground with inverted marking paint. Use red for electrical power, blue for potable water, and orange for telecommunications. This visual guide keeps multiple utility crews organized and prevents accidental cross-digging or overlapping.
-
Hire specialized trenching professionals: You must coordinate with licensed excavation contractors to dig precise, deep trenches. Electrical lines and water pipes cannot share the same trench space without specific vertical separations, and water lines must be buried deep beneath your region’s frost line to prevent pipes from freezing and bursting during the winter.
-
Document the underground layout: Before the trenches are backfilled with dirt, take extensive photographs of the open trenches with a tape measure visible for scale. This creates a permanent record of exactly where your vital utilities are buried, which is invaluable if you ever need to build an addition, install a pool, or plant large trees in the future.
4. Designing an Off-Grid Waste Management Strategy
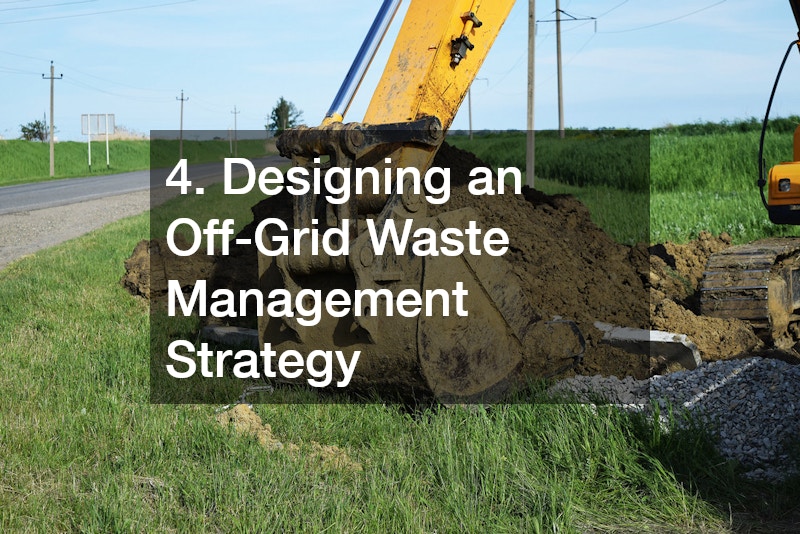
Perform a Perc Test to Size Your Drain Field Accurately
If your new land is located outside of municipal city sewer lines, you are entirely responsible for managing your home’s wastewater. This is done through a private, underground septic system. However, you cannot simply dig a hole and bury a tank wherever you please. The entire system is dictated by the soil’s ability to absorb and naturally filter liquid waste.
-
Schedule a percolation test: A “perc test” involves digging several deep holes on your property, filling them with water, and timing exactly how long it takes for the water to drain into the surrounding earth. It is highly recommended to schedule this test during the wettest season of the year to get a worst-case-scenario reading.
-
Size the system properly: The results of this test, combined with the number of bedrooms in your architectural plans (which indicates maximum potential occupancy), dictate the scope of residential septic system installations. If your soil drains too slowly, you will be required to install a significantly larger, highly engineered, and much more expensive drain field.
-
Understand the engineering requirements: In areas with heavy clay or high water tables, standard gravity-fed systems will not work. You may have to design an above-ground mound system or an aerobic treatment unit, which requires electrical pumps and advanced filtration mediums.
Position the Waste Receptacle Away from Heavy Traffic
The physical placement of your underground waste tank and its accompanying drain field is a puzzle that must be solved early in the site planning process. The drain field consists of perforated pipes buried in gravel trenches that slowly release treated wastewater into the earth. It is an incredibly fragile piece of infrastructure.
-
Protect the drain field area: Stake out the exact locations early in the build. Ensure they are placed far away from future driveways, parking pads, or heavy equipment pathways. Driving over a drain field will crush the underground pipes and compact the soil, instantly destroying the system’s ability to filter water.
-
Avoid deep-rooted vegetation: Keep the system far away from water-seeking trees like willows, maples, or oaks. Tree roots will aggressively seek out the nutrient-rich water in the drain field, infiltrating the pipes and causing massive, expensive blockages.
-
Adhere to legal setbacks: When coordinating a local septic tank installation, you must strictly adhere to county health department regulations. The tank and drain field must maintain specific minimum distances from your property lines, your home’s foundation, and most importantly, any underground drinking water wells.
5. Protecting Your Underground Infrastructure Long-Term
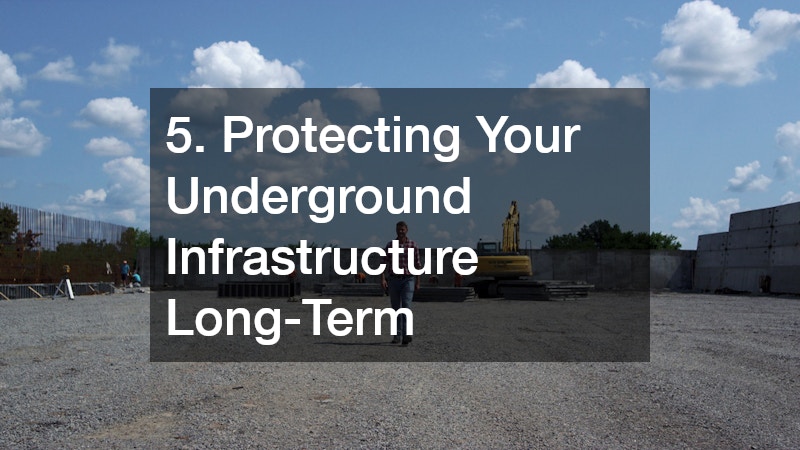
Install Effluent Filters to Prevent Drain Field Clogs
The longevity of your off-grid plumbing system relies entirely on keeping solid waste out of the delicate drain field. The main tank is designed to hold solids at the bottom while allowing only liquid effluent to flow out into the yard. If solids escape the tank, they will quickly clog the soil in the drain field, leading to a catastrophic system failure that costs tens of thousands of dollars to dig up and replace.
-
Demand an effluent filter: When the system is being built, request that a high-quality, easily accessible effluent filter be installed on the outlet baffle of your tank. This simple plastic mesh acts as a final fail-safe, stopping hair, grease, and non-biodegradable solids from migrating into the pipes.
-
Maintain clear access: Build strong relationships with reputable septic companies during the initial construction phase. Have these experts physically map the exact GPS coordinates of your tank’s access lids before final landscaping and grass seed covers them up, saving you from having to blindly dig up your yard later.
-
Install surface risers: If your tank is buried deeply, have the installers add PVC risers that bring the access lids up to ground level. This makes future maintenance incredibly easy and prevents technicians from having to tear up your lawn just to open the lid.
Schedule Routine Maintenance Reminders Before You Move In
Preparing your land and installing the infrastructure is only the beginning of your responsibilities as a homeowner. These systems are not “set it and forget it.” Preserving the integrity of the soil and the functionality of the home’s plumbing requires strict, disciplined upkeep.
-
Create a maintenance binder: Dedicate a physical binder or a digital folder specifically for your underground systems. Store the engineered blueprints, the perc test results, the surveyor’s map, and all warranty information in one place.
-
Set calendar alerts: Do not rely on your memory. Set recurring digital calendar alerts for inspection and maintenance intervals immediately upon moving into the home.
-
Budget for routine care: Understand the financial reality of off-grid utilities. You must budget for professional septic pumping services every three to five years. The exact frequency depends heavily on your household size, your daily water usage, and whether or not you use a garbage disposal (which drastically increases solid waste accumulation).
Conclusion
The journey from a plot of raw, untouched earth to a fully graded, utility-ready residential property is a complex process of engineering, legal navigation, and heavy physical labor. By systematically surveying your boundaries, rigorously testing the soil beneath your feet, and carefully directing the flow of natural water, you create an impenetrable foundation for your future home.
Rushing the dirt work or cutting corners on underground utility installations guarantees future structural failures and plumbing disasters. Patience during this phase is the single best financial investment you can make in your property. Every dollar spent on proper compaction, accurate soil testing, and strategic grading pays massive dividends by preventing devastating issues decades down the road.
As you prepare to break ground on your dream home, take a step back from the architectural blueprints and focus first on the earth. Start your build journey by ordering a thorough boundary survey and a comprehensive geotechnical soil test. Only when you fully understand the canvas can you safely and successfully build the masterpiece.
Building a dream home is a monumental undertaking, and it is easy to get caught up in the exciting visual details like selecting quartz countertops, choosing the perfect hardwood floor finish, or designing a sprawling master bathroom. However, the true success of any custom home is determined long before the first wooden wall stud is framed. The raw land itself—its topography, its hidden subterranean characteristics, and its legal boundaries—dictates the structural integrity and long-term viability of everything built upon it.
Skipping or rushing through proper land preparation is the most common and financially devastating mistake a new builder can make. When the earth is not respected and correctly engineered, the consequences manifest as cracked concrete foundations, perpetually flooded basements, and blown construction budgets that can derail the entire project. The ground must be shaped, stabilized, and meticulously mapped to transition from a piece of raw nature to a secure, functioning residential footprint.
This comprehensive guide serves as your step-by-step roadmap for preparing your land for a new build. We will explore how to accurately assess soil health, strategically grade the earth for optimal water runoff, lay the essential groundwork for underground utilities, and plan the critical off-grid waste management systems necessary for rural or suburban properties. By understanding and executing these foundational steps, you safeguard your investment and ensure your home stands solid for generations.
1. Mapping the Property and Removing Initial Obstacles
Conduct a Thorough Boundary and Environmental Survey
Before you touch a single blade of grass or move a single stone on your new property, you must have an absolute, legally binding understanding of your property lines. Relying on old fence lines or the verbal assurances of a previous owner is a dangerous gamble. If you accidentally build a driveway, a retaining wall, or a portion of your garage on a neighbor’s land or a city easement, you can be legally forced to tear it down at your own expense.
-
Hire a licensed land surveyor: Bring in a professional to physically mark your exact property lines, zoning setbacks, and utility easements with high-visibility stakes. This provides a safe, defined perimeter for your architectural plans.
-
Identify environmental restrictions: Many plots of land feature hidden environmental protections. You need comprehensive site development services to map out protected wetlands, endangered vegetation zones, and protected wildlife habitats. Violating these zones can result in massive government fines and immediate halt-of-work orders.
-
Establish optimal access points: A survey will also help you determine the safest and most logical place to establish your construction entrance. This entrance must eventually transition into your permanent driveway, meaning it needs to be mapped in a location that offers safe lines of sight for pulling out onto public roads.
Clear Vegetation Systematically to Save Usable Timber
Once your boundaries are strictly defined, the physical transformation of the land begins with clearing away obstacles. However, land clearing should never be a blind, scorched-earth process. Mature trees add massive aesthetic and financial value to a property, provide natural summer shade that lowers cooling costs, and help prevent soil erosion.
-
Tag the trees you want to keep: Walk the property with bright surveyor’s tape and mark every healthy, mature tree you wish to preserve. Ensure that all heavy machinery stays well outside their critical root zones (usually extending as far out as the tree’s canopy). Driving heavy equipment over these root systems compacts the soil and can slowly kill a tree over several years.
-
Evaluate your clearing methodology: The way you handle debris depends heavily on the scale of the parcel. For lightly wooded or brush-heavy lots, it might make financial sense to look into excavator rentals for a DIY approach to pulling up small stumps and moving fallen logs.
-
Process the debris wisely: Decide early on how to handle the organic waste. Renting a commercial wood chipper can turn brush into valuable mulch for your future landscaping. Larger timber can be bucked and split for firewood, or even milled into custom lumber for decorative beams inside your new home.
2. Assessing Soil Health and Groundwater Levels
Order Geotechnical Reports to Determine Bearing Capacity
You cannot judge the structural integrity of your land by looking at the topsoil. The earth beneath your feet is composed of various layers of organic matter, clays, sands, and rock, all of which react differently to the massive, concentrated weight of a house. To prevent your foundation from sinking, shifting, or cracking in the future, you must scientifically determine the bearing capacity of the soil.
-
Commission a core drilling test: A geotechnical engineer will drill deep into the earth at the exact site of your future foundation to extract soil core samples. This reveals the precise composition of the earth layer by layer.
-
Analyze the engineering data: Once the report is generated, it dictates the structural requirements of your concrete footings. Experienced excavating contractors rely heavily on these reports. If the soil is weak or expansive, they will know exactly how much unsuitable material needs to be removed and replaced with engineered, structural fill dirt.
-
Prepare for hidden costs: Geotechnical testing can reveal the presence of subterranean bedrock just below the surface. If bedrock is found where your basement is supposed to go, excavation companies will have to bring in specialized hydraulic hammers or even use controlled blasting techniques to carve out the foundation, which requires a significant adjustment to your construction budget.
Identify Natural Drainage Patterns to Prevent Future Flooding
Water is the single most destructive force to a residential structure. If the land naturally slopes toward your future home, every major rainstorm will direct thousands of gallons of water straight into your foundation walls, leading to hydrostatic pressure, basement leaks, and mold.
-
Observe the land during a storm: Visit your lot during a heavy downpour to map out the natural water flow. Note where water pools, where temporary streams form, and how quickly the ground absorbs the moisture.
-
Design strategic water management: Use this observational data to plan your grading strategy. You will need to design swales (shallow drainage ditches), retaining walls, or underground French drains to catch surface water and redirect it safely away from the building envelope.
-
Understand soil drainage capabilities: Different soils handle water very differently, which directly impacts your foundation risk.
3. Shaping the Earth for Your Foundation and Utilities
Establish a Level Pad with Proper Compaction Techniques
With the land cleared and the soil tested, the heavy earthmoving begins. Creating the building pad is a highly precise operation. The ground must be cut away from the high points and filled into the low points until a perfectly level, incredibly dense surface is achieved. If this step is rushed, the soil will settle unevenly under the weight of the house, snapping the foundation in half.
-
Utilize precise laser guidance: Modern site prep excavations rely on heavy machinery equipped with laser-guided grading systems. This technology ensures that the building pad is cut to the exact millimeter specified by the structural engineer.
-
Compact the soil in measured lifts: When adding fill dirt to level a slope, you cannot simply dump a massive pile of earth and drive over it. The soil must be spread in thin layers, usually six to twelve inches thick, known as “lifts.”
-
Insist on the right equipment: Each lift must be aggressively compacted using a heavy vibratory sheep’s foot roller. This machine pushes the air out of the soil and locks the particles together, achieving the necessary density to support concrete footings without future settling.
Dig Utility Trenches Before Pouring Concrete
Before the concrete trucks arrive to pour your foundation, the invisible lifeline of your home must be laid underground. Your property needs to be connected to the electrical grid, municipal water supplies (or a private well), and modern telecommunications. Trenching is a delicate, highly regulated process that requires strict adherence to local building codes.
-
Organize the utility layout: Color-code your trench lines on the ground with inverted marking paint. Use red for electrical power, blue for potable water, and orange for telecommunications. This visual guide keeps multiple utility crews organized and prevents accidental cross-digging or overlapping.
-
Hire specialized trenching professionals: You must coordinate with licensed excavation contractors to dig precise, deep trenches. Electrical lines and water pipes cannot share the same trench space without specific vertical separations, and water lines must be buried deep beneath your region’s frost line to prevent pipes from freezing and bursting during the winter.
-
Document the underground layout: Before the trenches are backfilled with dirt, take extensive photographs of the open trenches with a tape measure visible for scale. This creates a permanent record of exactly where your vital utilities are buried, which is invaluable if you ever need to build an addition, install a pool, or plant large trees in the future.
4. Designing an Off-Grid Waste Management Strategy
Perform a Perc Test to Size Your Drain Field Accurately
If your new land is located outside of municipal city sewer lines, you are entirely responsible for managing your home’s wastewater. This is done through a private, underground septic system. However, you cannot simply dig a hole and bury a tank wherever you please. The entire system is dictated by the soil’s ability to absorb and naturally filter liquid waste.
-
Schedule a percolation test: A “perc test” involves digging several deep holes on your property, filling them with water, and timing exactly how long it takes for the water to drain into the surrounding earth. It is highly recommended to schedule this test during the wettest season of the year to get a worst-case-scenario reading.
-
Size the system properly: The results of this test, combined with the number of bedrooms in your architectural plans (which indicates maximum potential occupancy), dictate the scope of residential septic system installations. If your soil drains too slowly, you will be required to install a significantly larger, highly engineered, and much more expensive drain field.
-
Understand the engineering requirements: In areas with heavy clay or high water tables, standard gravity-fed systems will not work. You may have to design an above-ground mound system or an aerobic treatment unit, which requires electrical pumps and advanced filtration mediums.
Position the Waste Receptacle Away from Heavy Traffic
The physical placement of your underground waste tank and its accompanying drain field is a puzzle that must be solved early in the site planning process. The drain field consists of perforated pipes buried in gravel trenches that slowly release treated wastewater into the earth. It is an incredibly fragile piece of infrastructure.
-
Protect the drain field area: Stake out the exact locations early in the build. Ensure they are placed far away from future driveways, parking pads, or heavy equipment pathways. Driving over a drain field will crush the underground pipes and compact the soil, instantly destroying the system’s ability to filter water.
-
Avoid deep-rooted vegetation: Keep the system far away from water-seeking trees like willows, maples, or oaks. Tree roots will aggressively seek out the nutrient-rich water in the drain field, infiltrating the pipes and causing massive, expensive blockages.
-
Adhere to legal setbacks: When coordinating a local septic tank installation, you must strictly adhere to county health department regulations. The tank and drain field must maintain specific minimum distances from your property lines, your home’s foundation, and most importantly, any underground drinking water wells.
5. Protecting Your Underground Infrastructure Long-Term
Install Effluent Filters to Prevent Drain Field Clogs
The longevity of your off-grid plumbing system relies entirely on keeping solid waste out of the delicate drain field. The main tank is designed to hold solids at the bottom while allowing only liquid effluent to flow out into the yard. If solids escape the tank, they will quickly clog the soil in the drain field, leading to a catastrophic system failure that costs tens of thousands of dollars to dig up and replace.
-
Demand an effluent filter: When the system is being built, request that a high-quality, easily accessible effluent filter be installed on the outlet baffle of your tank. This simple plastic mesh acts as a final fail-safe, stopping hair, grease, and non-biodegradable solids from migrating into the pipes.
-
Maintain clear access: Build strong relationships with reputable septic companies during the initial construction phase. Have these experts physically map the exact GPS coordinates of your tank’s access lids before final landscaping and grass seed covers them up, saving you from having to blindly dig up your yard later.
-
Install surface risers: If your tank is buried deeply, have the installers add PVC risers that bring the access lids up to ground level. This makes future maintenance incredibly easy and prevents technicians from having to tear up your lawn just to open the lid.
Schedule Routine Maintenance Reminders Before You Move In
Preparing your land and installing the infrastructure is only the beginning of your responsibilities as a homeowner. These systems are not “set it and forget it.” Preserving the integrity of the soil and the functionality of the home’s plumbing requires strict, disciplined upkeep.
-
Create a maintenance binder: Dedicate a physical binder or a digital folder specifically for your underground systems. Store the engineered blueprints, the perc test results, the surveyor’s map, and all warranty information in one place.
-
Set calendar alerts: Do not rely on your memory. Set recurring digital calendar alerts for inspection and maintenance intervals immediately upon moving into the home.
-
Budget for routine care: Understand the financial reality of off-grid utilities. You must budget for professional septic pumping services every three to five years. The exact frequency depends heavily on your household size, your daily water usage, and whether or not you use a garbage disposal (which drastically increases solid waste accumulation).
Conclusion
The journey from a plot of raw, untouched earth to a fully graded, utility-ready residential property is a complex process of engineering, legal navigation, and heavy physical labor. By systematically surveying your boundaries, rigorously testing the soil beneath your feet, and carefully directing the flow of natural water, you create an impenetrable foundation for your future home.
Rushing the dirt work or cutting corners on underground utility installations guarantees future structural failures and plumbing disasters. Patience during this phase is the single best financial investment you can make in your property. Every dollar spent on proper compaction, accurate soil testing, and strategic grading pays massive dividends by preventing devastating issues decades down the road.
As you prepare to break ground on your dream home, take a step back from the architectural blueprints and focus first on the earth. Start your build journey by ordering a thorough boundary survey and a comprehensive geotechnical soil test. Only when you fully understand the canvas can you safely and successfully build the masterpiece.